Intro:
This blog post is the 3rd in a 4 part series with the goal of thoroughly explaining how Kubernetes Ingress Works:
- Kubernetes Networking and Services 101
- Ingress 101: What is Kubernetes Ingress? Why does it exist?
- Ingress 102: Kubernetes Ingress Implementation Options (this article)
- Ingress 103: Productionalizing Kubernetes Ingress (delayed, ETA mid-2020)
In the previous posts, I purposefully left out some advanced implementation options as I wanted to keep a nice easy to follow flow of related topics that could help develop a strong foundational mental schema. In this post, I’ll build on that foundation with the purpose of opening up your mind to the possibilities of options for:
- Ingressing into the Inner Cluster Network, getting traffic to flow over the network boundary that exists between the LAN where Kubernetes Nodes live and the Inner Cluster Network where Kubernetes’ services and pods live.
- Ingress HTTPS implementations
- Ingress Architectures
- Ingress Controllers
Ingressing into the Inner Cluster Network:
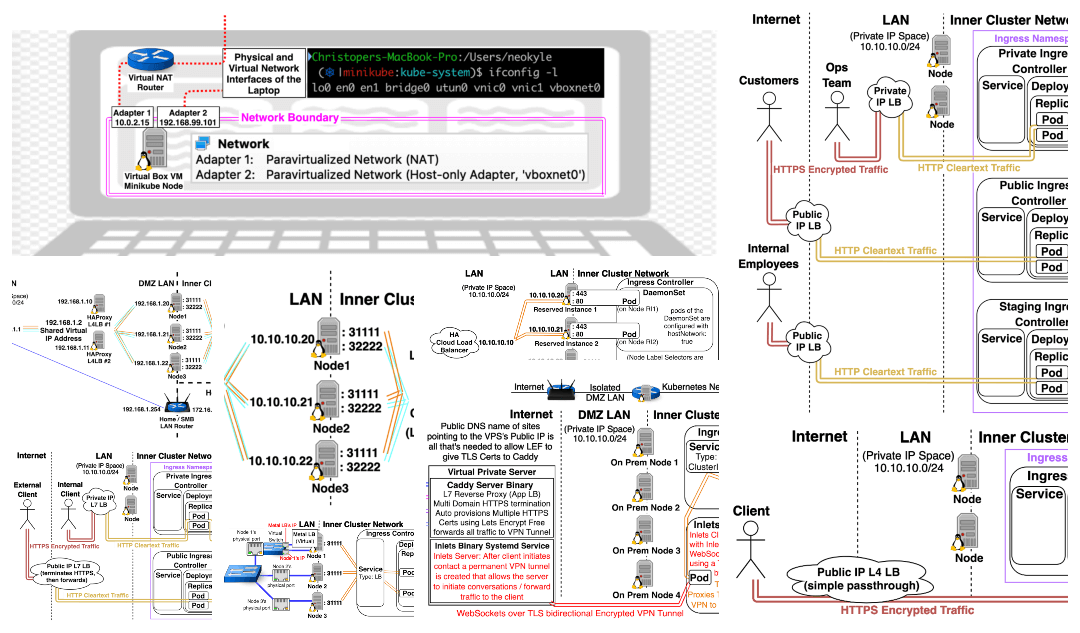
Option 1: NodePort/LoadBalancer Service with externalTrafficPolicy: “Cluster” You can add this to the yaml configuration of Kubernetes Services of type NodePort and LoadBalancer. If you don’t specify anything, externalTrafficPolicy will default to “Cluster” (can also be written as externalTrafficPolicy: “”). Setting to “Cluster” will Load Balance traffic equally between all nodes. 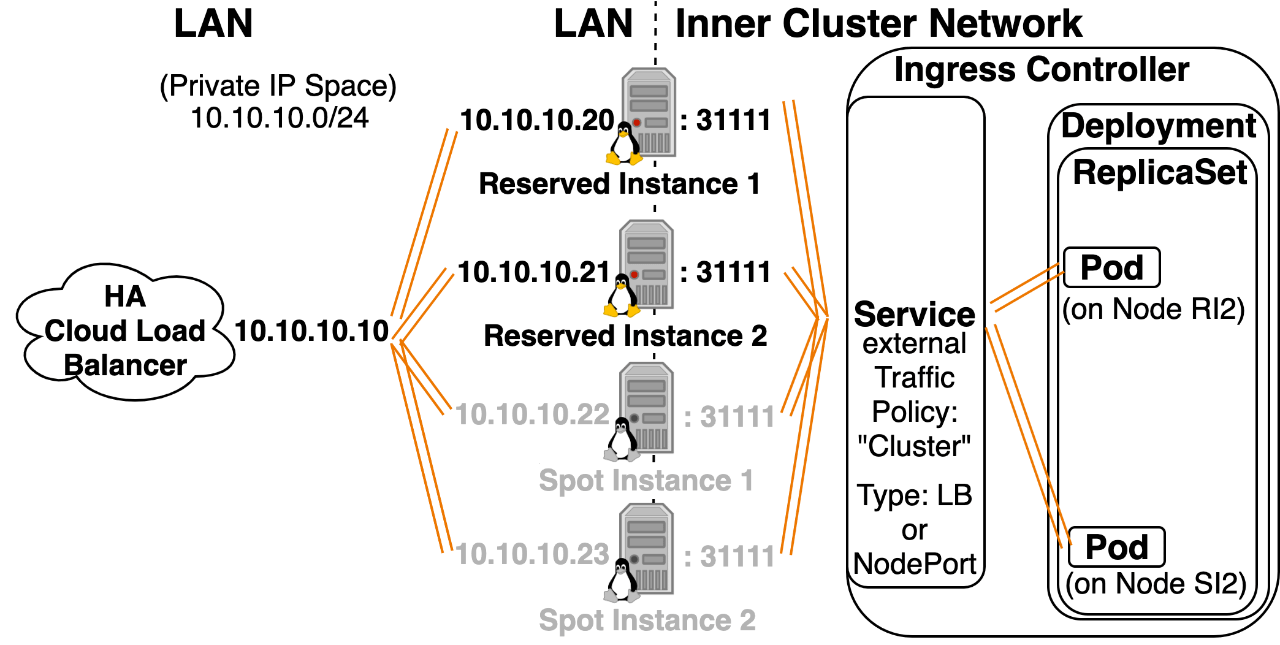 Pros:
Pros:
- externalTrafficPolicy: “Cluster” has greater compatibility with different Kubernetes Implementations compared to “Local”. (It’s not well supported on kops on AWS for example.)
Cons:
- Incoming traffic will be load balanced across all nodes. This can create a lack of consistent network stability in environments with lots of node reboots (spot instances or constant scaling up and down of the total number of nodes).
- Pods get an incorrect Source IP due to SNATing, they see Kubernetes Node IP as the Source IP. (This could be a problem if you want a pod to implement rate-limiting, or detect countries where traffic is originating coming from.)
Option 2: NodePort/LoadBalancer Service with externalTrafficPolicy: “Local” You can add this to the yaml configuration of Kubernetes Services of type NodePort and LoadBalancer. “Local” refers to the fact that a Node will only forward incoming NodePort traffic to a pod that exists locally on that host. Setting to “Local” will Load Balance traffic to the subset of nodes that have Ingress Controllers running on them. 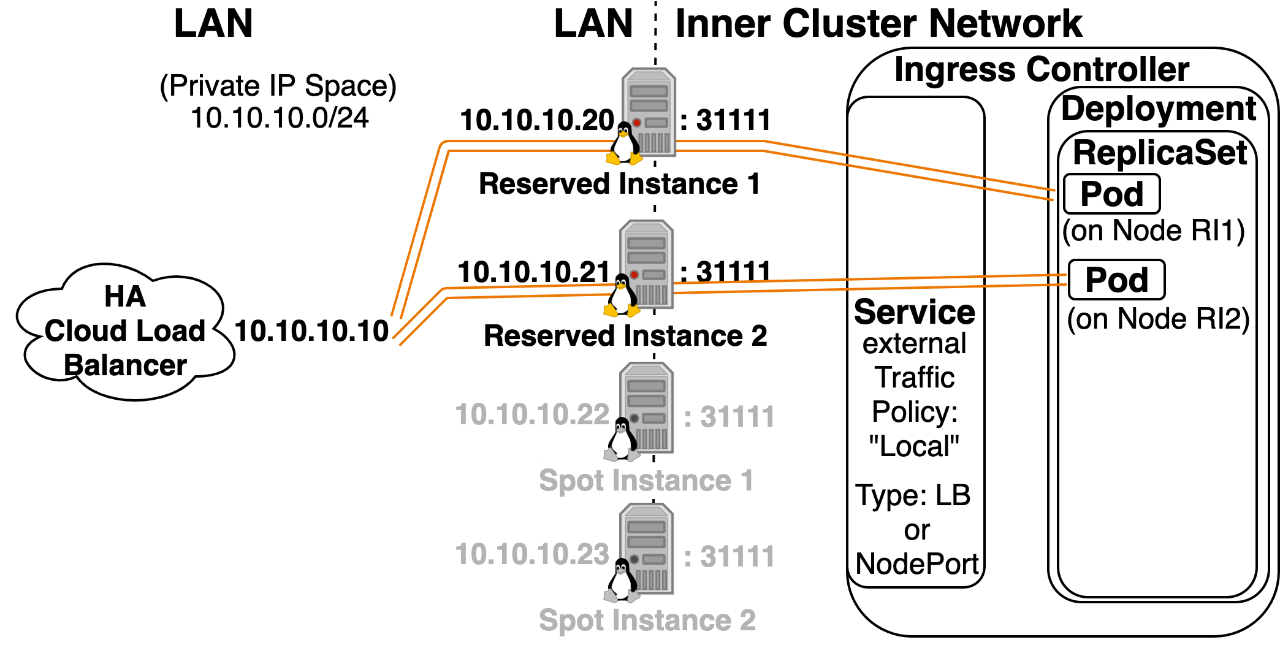 Pros:
Pros:
- Pods have a better chance of getting the correct Source IP. (It could be the case that instead of incorrectly seeing the Kubernetes Node IP as the Source, a pod would incorrectly see the External LB’s IP as the Source, further configuration can usually fix this.)
- Traffic is only sent to the subset of Nodes that have Ingress Controller pods running on them. This creates a trivial latency benefit by eliminating a network hop. (This is accomplished by creating a /healthz endpoint on a new NodePort for Nodes that are running an Ingress Controller. The External LB then targets these Nodes, and if traffic goes to a Node that’s not running an Ingress Controller, that node drops the traffic.)
- This can increase networking stability, in environments with lots of node reboots, which could be caused by using spot instances or cluster autoscaler with several node tiers. (You would increase stability by only deploying ingress controller pods on nodes that are extra stable. Sending pods to extra stable nodes can be accomplished using node affinity statements or a daemonset with node label selectors.)
Cons:
- externalTrafficPolicy: “Local” is supported by fewer Kubernetes Implementations than “Cluster”.
- If you read through the GitHub issues, it’s known to be broken in a few ways on Kops and EKS running on AWS, but you still have the option of selecting this configuration, and unfortunately it semi-works enough that it can make you think it’s working, (for example the health checks that show the nodes running an Ingress Controller will trigger, but then the health checks won’t dynamically update themselves), it’s recently become possible to force it to work on AWS, but it’s a multi-layered union of a problem that involves a fair bit of work.
- Not supported by all CNIs.
- I’ve seen Kubernetes patch updates cause regressions that break this, so it could create more stability when you’re on a working version, but then an update could lower stability if it introduces a regression.
Option 3: Pod directly exposed on the LAN using hostNetwork: “true” hostNetwork: “True” will give a pod the same IP address as the host node and directly expose the pod on the LAN network. If the pod is listening for traffic on port 443, the host node will be listening for traffic on port 443, and traffic that comes in on port 443 of the host node will be mapped to the pod. This bypasses Kubernetes Services and Container Network Interfaces altogether. Note: If you enable this setting, you’ll also need to set the Ingress Controller Pod’s dnsPolicy spec field to ClusterFirstWithHostNet, so that it can resolve Inner Cluster DNS names.  Pros:
Pros:
- A pod that specifies this will work even if CNI isn’t working. (Control Plane components running as pods use this setting for that reason.)
- You can have an Ingress Controller listen directly on port 443/80 of the host node, which is very useful for minikube and Raspberry Pie setups that might not have access to a LoadBalancer.
- Pods have a better chance of getting the correct Source IP since the node won’t be SNAT’ing the traffic before forwarding it to the pod. (This can be a nice plan B, if you really need to know the Source IP and externalTrafficPolicy: “Local” doesn’t work for your Kubernetes Implementation)
- If you need to increase networking stability, in environments with lots of node reboots (spot instances or constant scaling up and down of the total number of nodes), and the externalTrafficPolicy: “Local” implementation isn’t supported or you’re worried about stability from updates potentially breaking its functionality. You can leverage hostNetworking: “True” to have the load balancer only send traffic to a subset of extra stable nodes. You could do this by labeling 2-3 extra stable nodes as tier=ingress, using a daemonset with a Node Selector to make the daemonset only run on that subset of nodes, and edit the LoadBalancer’s HealthCheck to only send to nodes listening on that port. Only nodes running the pod with hostNetwork: “true” will be listening on that port, and thus the LB will only send traffic to those nodes.
Cons:
- Won’t always work. If the host node is already listening for traffic on the port that the pod is trying to bind, the pod won’t be scheduled.
- If it does work you’ll only be able to run 1 replica of this pod per node, since the first replica will use up the port.
- Kubernetes Security Compliance scanners complain about workloads that use this mode.
- Bypassing Kubernetes Services and CNI means these pods also bypass Kubernetes Network Policies.
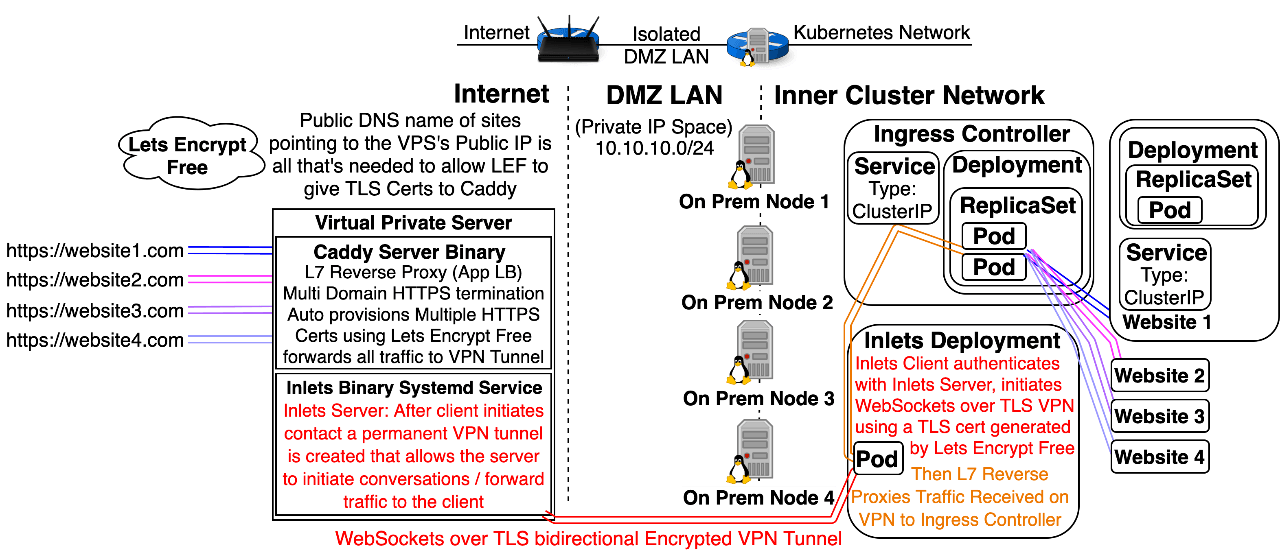
Option 4: Use an Inlets Server to expose a Cluster IP Ingress Controller Service on the Internet or a LAN: Note: Inlets, by CNCF Ambassador Alex Ellis, is not a Kubernetes Native solution; however, it happens to work great with Kubernetes. Inlets is a universal solution to ingress that allows you to forward traffic coming to an Inlets Server (hosted on the Public Internet or a LAN) to a service hosted on a normally unreachable private inner network.
- It works with x64 and ARM processors.
- The Private Inner network could exist on the Public Cloud, on Premises, behind multiple layers of Carrier Grade NAT (no chance at having a DHCP Public IP with dynamic DNS and port forwarding configured), a Kubernetes Inner Cluster Network, behind a Minikube Linux VM, behind a OpenBox Virtual Network NAT hosted on a Laptop that’s connected to the internet via an LTE uplink supplied by a cell phone’s mobile wifi hotspot.
- The server doesn’t need a route to the private inner network that it will forward traffic to, but the private inner network will need a route to the server.
 Pros:
Pros:
- Inlets is the only universal solution for publicly exposing an Ingress Controller, it’ll work on a cluster hosted at home, on a raspberry pie, on-prem, or in the cloud.
- Inlets uses free open source software that can be hosted on any Virtual Private Server, a $0.007/hour ($5/month) Digital Ocean VPSs will work fine.
- Inlets leverages multiple automation tools to make an extremely complex advanced networking technique easy.
- Inlets has a free version that supports L7 Traffic (HTTP + gRPC), and a paid version is being developed that will supports L4 Traffic.
Cons:
- Inlets Operator software doesn’t currently support Encrypted VPN Tunnel, and Encrypted VPN Tunnel isn’t enabled by default / requires correct configuration.
- Routers performing NAT create a layer of protection that’s often the primary line of defense for many networks. Inlets makes it easy to poke a large hole in that protection that allows someone on the internet to backdoor through NAT, so this method should never be installed on a laptop or corporate environment without a deep understanding of networking, security, and how to safely implement this technique. Don’t do this without approval from Security and Operations Teams.
- Inlets is a potentially dangerous tool that’s extremely easy to use, and I haven’t seen documentation warning of the dangers or explaining how to safely set it up, using Encryption, Firewalls, DMZs, or VPN + LAN only implementation guide. (I hope to remedy this with a future post on Inlets and Dev Clusters, I’ll edit this to become a link when said post is available, maybe Late 2020.) Words of advice in the meantime:
-
- HTTPS and encrypted VPN Tunnel alone aren’t enough to be secure.
- If you expose something on the public internet it can be compromised, so you need to limit the blast radius of a compromisation.
- If something becomes compromised while using Inlets the blast radius is much bigger, instead of just a server, several networks can be compromised. Now imagine if Inlets were installed on Minikube on a Laptop or a Raspberry Pi Cluster, now you have a mobile trojan horse that can back door into several networks.
- Don’t install Inlets on a Minikube or Raspberry Pi Cluster without understanding the risks and taking countermeasures.
- It’s best to Install Inlets on Servers located in a DMZ Network so that if your cluster does get compromised the blast radius will be limited.
-
Ingress HTTPS implementations:
Option 1: Buy a Public TLS Certificate and manually create Kubernetes TLS Secrets: This option exists, but overall it’s not recommended. Mainly for the reason mentioned in the previous article: Kubernetes API decided to standardize on the PEM format for HTTPS/TLS certs, but historically there are over 15++ formats that HTTPS/TLS certs can exist in, if you end up with a binary encoded TLS cert, you’ll probably have to figure out a bespoke method to convert it to a PEM text encoded TLS cert. Even if you have the mywebsite.com.key and mywebsite.com.crt file in the correct PEM text formatting, you could still mess up the manual creation of a Kubernetes secret from files. Pros:
- You can get a TLS cert that’s valid for 2 years.
Cons:
- You have to pay for TLS Certs.
- Manually creating TLS Secrets is error-prone.
- Your site could go down because you forgot to rotate out a fresh cert before the live one expired.
- You may need to invest a lot of time in setting up alerts/reminders of when the TLS cert will expire and needs to be rotated.
- You need to come up with a method/location of safely storing this sensitive file.
- TLS certs existing as secrets in the cluster means you should either give kubectl access to a few trusted people or implement proper RBAC tied to remote identity provider managed groups, limit access to etcd, ssh access to nodes, and make sure etcd, etcd backups, and nodes are encrypted at rest. To limit the people in your organization who have access to the cert.
Option 2: Use Ansible to automate management of a Private CA, Certs, and Kubernetes Secrets Generation: Ansible automation can make the management of anything trivial. If your Kubernetes Cluster is strictly for development or internal company use only, you can choose to shift complexity away from Kubernetes Tooling to Ansible Automation. If your team already has ansible knowledge it may make more sense to leverage ansible than to learn a Kubernetes specific piece of tooling, which usually ends up being relatively more complex. Pros:
- Works in environments without internet access.
- You can create TLS certs that are valid for decades, so you could ignore TLS Certificate rotation, which could make sense on an internal trusted network that hosts critical systems where uptime is more important than certificate rotation.
Cons:
- Encourages a bad habit of infrequent certificate rotation.
- Ansible could be leveraged to automate certificate rotation as well, but that takes more time to design and test.
- TLS certs existing as secrets in the cluster means you should either give kubectl access to a few trusted people or implement proper RBAC tied to remote identity provider managed groups, limit access to etcd, ssh access to nodes, and make sure etcd, etcd backups, and nodes are encrypted at rest. To limit the people in your organization who have access to the cert.
Option 3: Use Jetstack’s Cert-Manager to automate Kubernetes TLS Secrets: Cert-Manager is a Kubernetes Operator, software bot, by Jetstack that can automatically talk to TLS Certificate Authority’s software bots to automatically provision and rotate before expiration Kubernetes TLS Secrets. (Generally, this is the best option to use.) Pros:
- Cert-Manager can automate multiple HTTPS Cert types because it works with multiple Certificate Authorities:
-
- Paid Public TLS Certs using Venafi Public CA.
- Free Public TLS Certs using Lets Encrypt Free(LEF) Public CA
- Free Self-Signed PKI TLS Certs using HashiCorp Vault Internal CA.
-
- Cert-Manager can work with LEF’s multiple authentication options:
-
- If you can configure a publicly exposed server that subdomain.yourdomain.TLD is pointing to, then you can generate a TLS cert that’s valid for the subdomain.
- If you can configure DNS records associated with the Authoritative DNS Server of yourdomain.TLD, then you can generate subdomain or wildcard TLS certs.
- If you have Cloud IAM credentials with rights to configure DNS records of cloud provider managed Authoritative DNS servers associated with yourdomain.TLD, then you can generate subdomain or wildcard TLS certs.
-
- The first LEF authentication option offers automated TLS certs without needing any pre-existing secrets, which is helpful for avoiding secrets in source control.
- You can use the LEF’s second and third authentication mechanisms to provision HTTPS certs for Internal Private IP sites that are only accessible on the LAN like hashicorpvault.internal.yourdomain.TLD (The only limitation being that you could only use HTTPS for *.yourdomain.TLD) (While a HC Vault Internal CA would allow you to create HTTPS certs that could work over anydomain.anyending or even IPs)
- Cert-Manager is well documented, and easy to use, here’s a common workflow:
-
- You add an annotation to an Ingress Object
- CM uses information defined in the annotation and the Ingress object to automatically generates a Certificate CRD YAML Object, which stores metadata describing the state of the TLS cert it’s managing.
- CM will potentially mutate the Ingress Object so the Ingress controller will solve the LEF acme-challenge.
- CM will then generate and auto-update a Kubernetes TLS Secret.
-
Cons:
- TLS certs existing as secrets in the cluster means you should either give access to a few trusted people or implement proper RBAC tied to remote identity provider managed groups, limit access to etcd, ssh access to nodes, and make sure etcd, etcd backups, and nodes are encrypted at rest.
For Options 1, 2, and 3 HTTPS works as Follows: 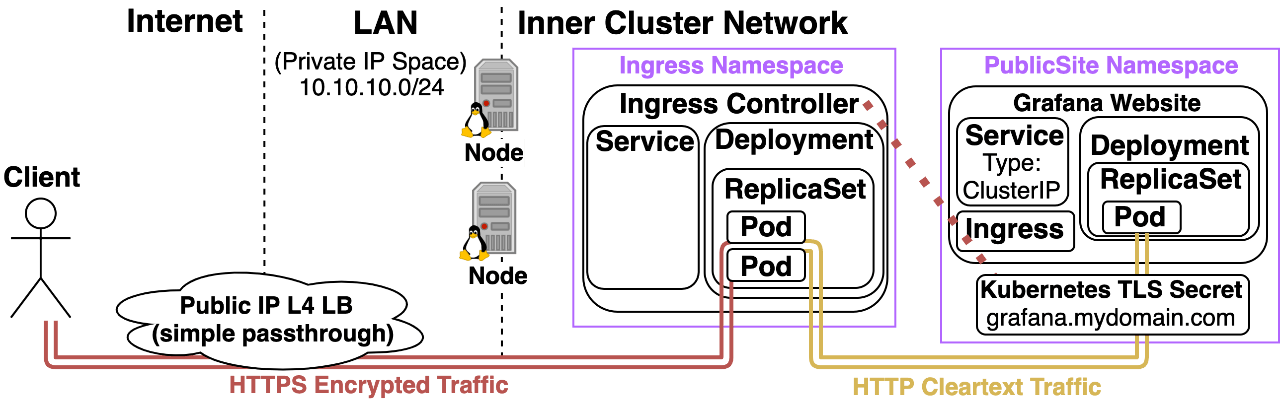 The Ingress Controller is able to configure itself using an Ingress Object and Kubernetes TLS Secret existing in another namespace. Traffic for https://grafana.mydomain.com is encrypted over the Internet and the LAN. HTTPS terminates at the Ingress Controller and is then cleartext within the Kubernetes Cluster. Option 4: Terminate HTTPS at the Load Balancer: AWS’s Classic Elastic Load Balancers are used by default on AWS for Kubernetes Services of type LoadBalancer. These allow you to specify an annotation on the Ingress Controller’s LB Service that references ACM (AWS Certificate Manager). The declarative configuration will then provision a Public or Private IP LB that can terminate HTTPS for your site. Inlets Caddy Server is another variation of this, and there’s a WAF variation that I’ll cover in the next article as well.
 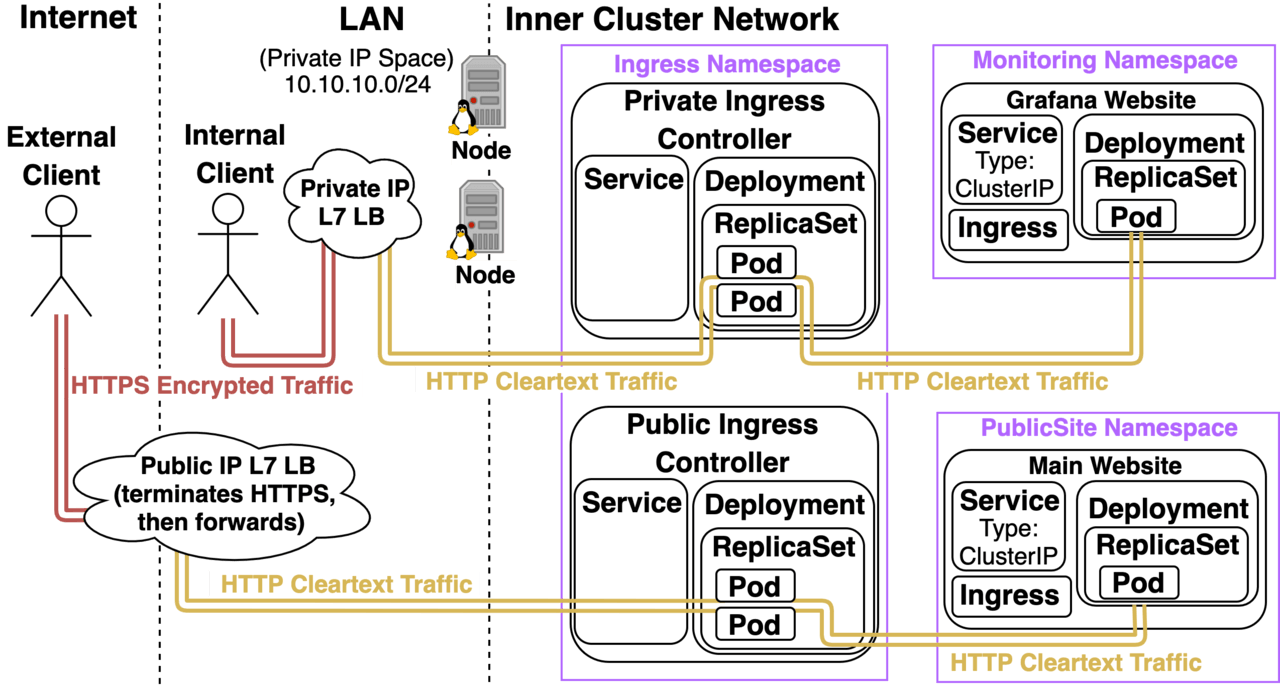 Pros:
Pros:
- AWS cELB with AWS Cert Manager or Inlets VPS will both handle TLS certificate provisioning and rotation on your behalf.
- HTTPS certs don’t exist as Kubernetes Secrets in the cluster meaning it’s easier to limit access to them.
Cons: (These apply to AWS cELB, not Inlets)
- AWS cELB doesn’t encrypt traffic over the LAN.
- The way to get this to work is your Ingress Controller’s Kubernetes Service will need to be configured to forward traffic that comes in on the https port to target port http of the Ingress Controller Pod. This has the effect of the ingress controller thinking all traffic comes in on port 80, which makes HTTP –> HTTPS redirect not work consistently.
Option 5:Terminate HTTPS only at the destination pod: This is the only option that offers end to end HTTPS traffic encryption, with no middle man, in many cases this is considered to be overkill; however, hosting HashiCorp Vault in clusters isn’t all that uncommon, and it’s definitely not overkill in that scenario because there’s a kubectl plugin called ksniff, which makes it easy to take a tcpdump of a pod and load it into wireshark running on an admin laptop. Terminating HTTPS at the vault pod can mitigate traffic sniffing based attacks. Assigning a dedicated Layer 4 LB to Kubernetes HC Vault service is one way of doing this, but LBs cost money so another option is to reuse an Ingress Controllers Layer 4 LB, and configure the Ingress Controller to act as a Layer 4 proxy for certain domains. (This assumes that the Ingress Controller is the only spot terminating HTTPS.) Nginx Ingress Controller can do this using –enable-ssl-passthrough, doing so causes a small latency hit as it works by introducing a virtual L4 LB in front of its L7 LB logic. Pros:
- Traffic is encrypted over the Internet, LAN, and Inner Cluster Network.
- Most confidentiality secure HTTPS Encryption option as there are no middlemen potentially inspecting the traffic.
Cons:
- Managing HTTPS per individual containerized application isn’t a scalable solution, due to lack of standardization. (Every web server pod will generally have its own unique method for setting up TLS; however, you could introduce standardization through means of offloading TLS termination to a sidecar proxy and then forwarding cleartext over the pods localhost, this is basically how service meshes work, but those tend to add complexity.)
Option 6: Terminate HTTPS in multiple places including the destination pod: Terminating HTTPS in multiple places is another way of offering end to end HTTPS encryption, it just means that you’ll have trusted middlemen (entities that are terminating and then re-encrypting traffic.) Web Application Firewalls (WAFs) and Service Meshes are common variants of this. The idea is that your HTTPS traffic could get terminated by a WAF, then re-encrypted on the WAF so it can be terminated by an Ingress Controller, then re-encrypted on the Ingress Controller so it can be terminated a final time at the pod level by an Istio sidecar proxy container and then forwarded cleartext to the destination container over the pod’s localhost. Pros:
- Traffic is encrypted over the Internet, LAN, and Inner Cluster Network.
- In some scenarios, trusted middlemen can be more secure than having no middle man. A WAF for example, is a Layer 7 Reverse Proxy that does things like filters HTTP headers that would reveal the identity of the backend server to make it harder to look up targeted backend server exploits and after it terminates HTTPS, it attempts to detect and filter out potential exploits/Layer 7 attacks, before re-encrypting the traffic and forwarding it to the backend.
Cons:
- If a trusted middleman gets compromised, then the traffic is compromised. It’s important to realize that Imperva WAF as a Service has been breached before and I’m sure they aren’t the first and won’t be the last.
- Increased complexity.
Ingress Architectures:
Option 1: Cloud Public LB Service type LB 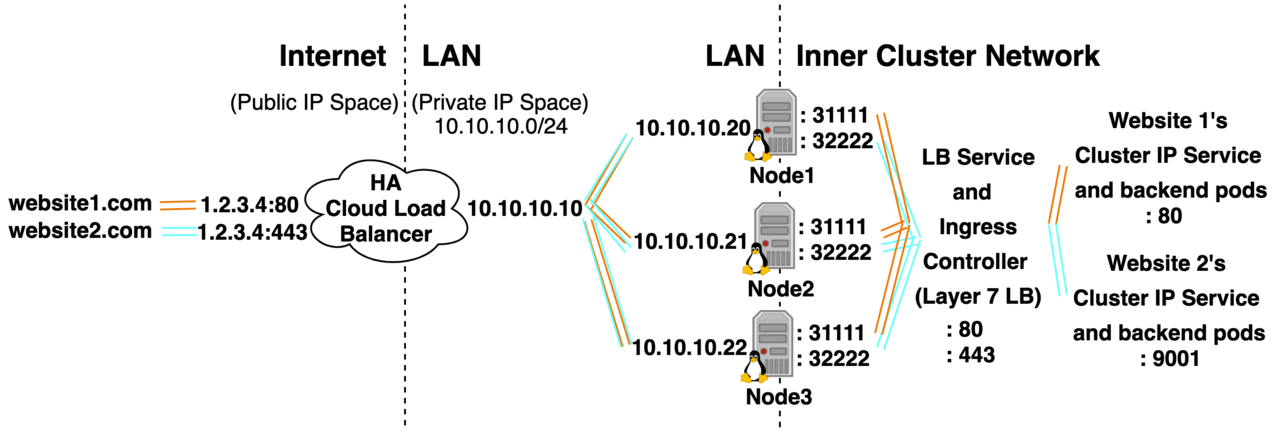 Note: The HA Cloud Load Balancer could be A Layer 4 Network LB (aware of IP/Ports) or A Layer 7 Application LB (aware of HTTP URLs, Paths, and HTTPS TLS Certificates) (The options available depend on the Cloud Provider used) Option 2: On-Premises Manually configure DIY LBs to point to service type NodePort
 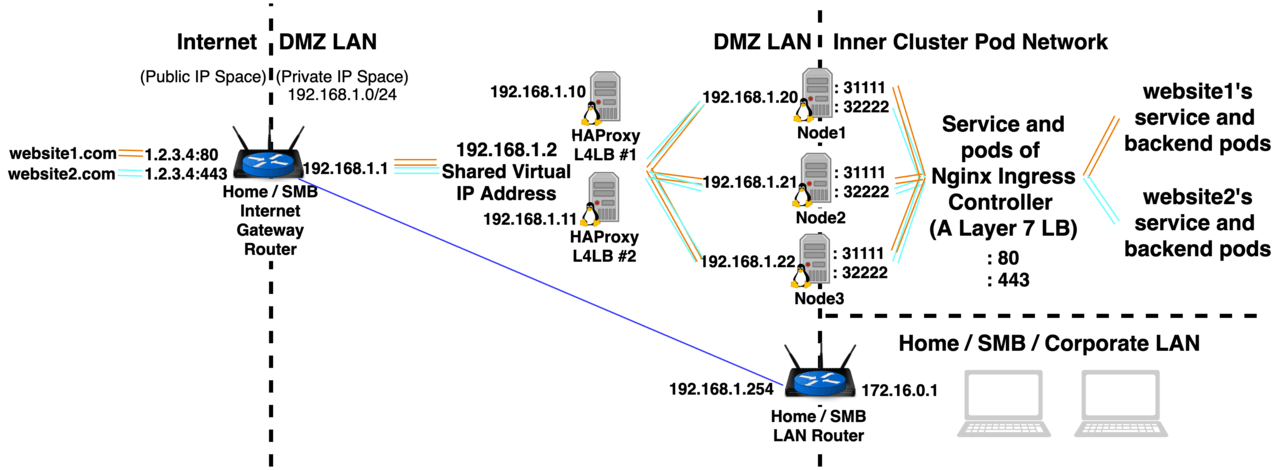 A Small Medium Business or Home Lab could be configured with a DMZ LAN to host the Kubernetes Cluster, and then have its trusted LAN behind the DMZ. website1.com and website2.com could CNAME to a Dynamic DNS address of a Home / SMB IGW Router, that router could then port forward traffic coming in on ports 443 and 80 of its WAN IP to a private IP in a DMZ. The kube-apiserver wouldn’t be accessible from the public internet, but would be accessible from the Home / SMB / Corporate LAN, and if the cluster was ever compromised the Home / SMB / Corporate LAN would be safe. Option 3: On-Premises Metal LB In the first article of the series, I pointed out that Kubernetes Nodes double as routers. Well, they can also pull triple duty and act as their own Layer 4 Load Balancers. Metal LB is software that allows Kubernetes Nodes to do just this. It’s not universally compatible (doesn’t work with all OS’s, Kubernetes Implementations, Cloud Providers, and CNIs) but it does work with my 2 favorite CNI’s Canal and Cilium. It’s also worth mentioning that ExternalTrafficPolicy: Cluster and Local are supported. Metal LB comes in 2 modes: Layer 4 mode and BGP mode. Metal LB Layer 4 mode works like this:
 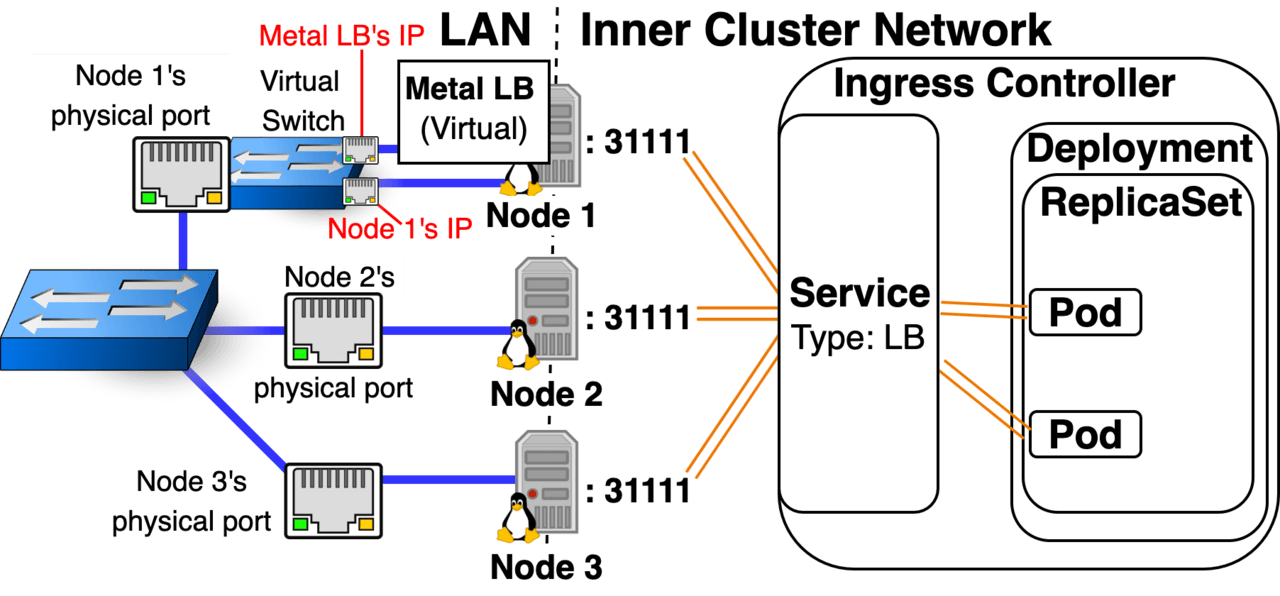 One of your Nodes is elected to be the leader, that one reconfigures its ethernet port to act like a switch so it can have multiple MAC/IP addresses. All incoming traffic is directed to the single node acting as the LB, if Node 1 fails then within 10 seconds Metal LB will come up on a different node with the same IP address so although there is no HA there is self-healing. Metal LB BGP Mode: Your Nodes act like Routers and talk to your Internet Gateway Router using BGP routing protocol, which allows for true HA Load Balancing. In this mode, every node acts as a Router, a LB, and a Node. Configuration of BGP mode makes provisioning a public IP a bit easier, but the initial setup is complex and full of limitations and gotchas. Option 4: Minikube (No Load Balancer, hostNetwork: true) You may be wondering how an ingress controller would work on minikube where a single node cluster is running in a VirtualBox VM.
 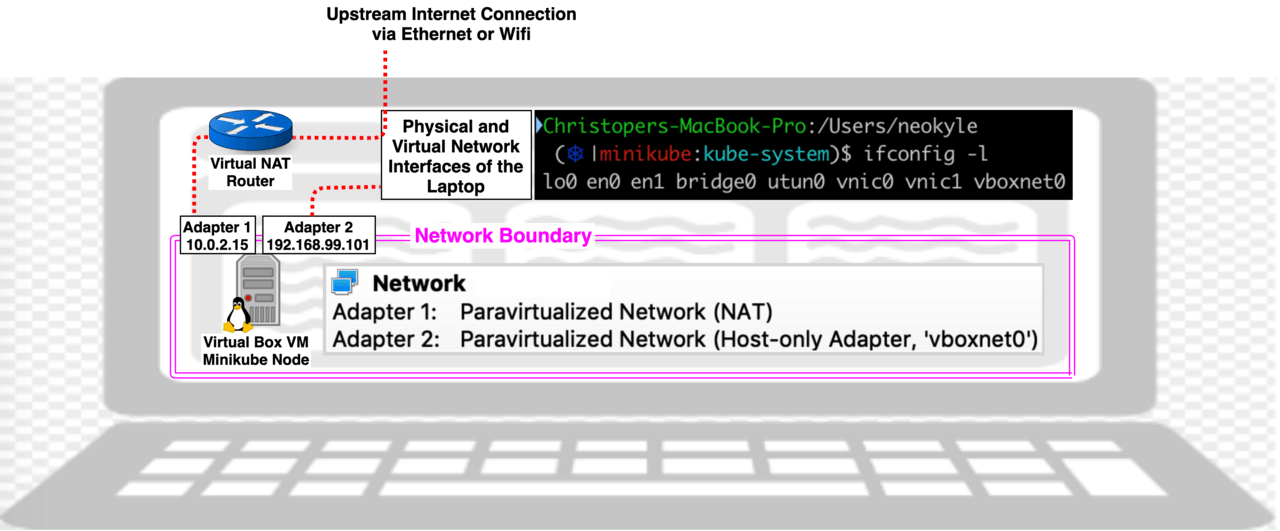 By default Minikube will be provisioned with 2 Network Adapters, the first is for internet access and uses NAT to form a 1-way traffic flow Network Boundary, the second only allows for a 2-way traffic flow, but maintains the Network Boundary by only allowing communication with your laptop. You can use the following 2 commands to see what IPs your minikube got provisioned with:
Bash(Laptop running minikube)# kubectl get pod -l=k8s-app=kube-proxy -n=kube-system -o yaml | egrep -hi "hostNet|hostIP"
    hostNetwork: true
    hostIP: 10.0.2.15
Bash(minikube)# minikube ip
    192.168.99.101

Bash(Laptop running minikube)# minikube addons enable ingress
Will deploy an ingress controller pod to the kube-system namespace. It will be configured with “hostNetwork: true” which will allow it to listen for traffic coming in on ports 80 and 443 of the Minikube VM’s IP address, 192.168.99.101 in my case, (remember the minikube VM will have 2 IPs, we’ll need to use the IP that allows incoming traffic from the Laptop). After enabling nginx-ingress-controller deployment on minikube, to get it to work I deployed a service and ingress yaml object that referenced the URL mywebsite.laptop. I then edited my host file to map that URL to the IP address of the Ingress Controller that allows incoming traffic.
Bash(Laptop running minikube)# sudo nano /etc/hosts
192.168.99.101   mywebsite.laptop
Once that was done, the website hosted in minikube is visible by going to ChromeBrowser: http://mywebsite.laptop
Ingress Controllers:
In addition to all of the above permutations of how you can architect and configure Ingress into the cluster, if you look at the official docs, for Ingres Controllers, you’ll see there’s a plethora of flavors to choose from when it comes to the Ingress Controller (Self Configuring L7 LB) itself. Unfortunately, I don’t have enough hands-on experience with multiple Ingress Controllers to offer a meaningful deep-dive comparison of the different options; however, there are already a few articles that have done a decent job comparing different Ingress Controllers:
- Steven Acreman’s Kubedex site has a solid Comparison of various Ingress Controllers
- Juan Ignacio Giro also wrote a nice article Comparing Ingress Controllers.
If you want to learn more about the different Ingress Controllers available I suggest you read those links. What I’ll be sharing in this section of the article, is practical advice on:
- What’s the best Ingress Controller to start with
- Good strategies for kicking the tires on another Ingress Controller
- When does it make sense to look into other Ingress Controllers
What’s the best Ingress Controller to start with: There are so many that it’s hard to know where to start. For people new to Kubernetes the Nginx Ingress Controller by the maintainers of Kubernetes is probably the best place to start because it’s well documented and easy to use. There are, however, 2 big gotchas to be aware of if you choose to use the Nginx Ingress Controller:
- Underscores “_” in HTTP headers are perfectly valid according to the HTTP standard, but by default, Nginx will silently drop HTTP headers with underscores. (This is easily remedied by configuring it to allow them, but it’s a gotcha worth remembering.)
- There are 2 flavors of Nginx Ingress Controllers and they are completely different!
One’s offered by the maintainers of Nginx and the other is offered by the maintainers of Kubernetes so it’s safe to say that both versions are equally official. That being said, the one offered by the Kubernetes maintainers is more popular and thus recommended for beginners (It has 3 times as many GitHub stars and forks, it’s also worth mentioning that Bitnami offers a hardened fork of this variant.) When I was first learning Kubernetes I wasn’t aware that there were 2 versions. Now I realize that when the advice I found on Stack Overflow or a Grafana Graph I tried to import wasn’t working, it was because their configuration syntaxes and exported Prometheus Metrics are incompatible with each other. Here are links to the configs + a readme of the key differences:
- https://github.com/kubernetes/ingress-nginx/blob/master/docs/user-guide/nginx-configuration/configmap.md
- https://github.com/nginxinc/kubernetes-ingress/blob/master/docs/configmap-and-annotations.md
- https://github.com/nginxinc/kubernetes-ingress/blob/master/docs/nginx-ingress-controllers.md#differences-between-nginxinckubernetes-ingress-and-kubernetesingress-nginx-ingress-controllers
Good strategies for kicking the fires on another Ingress Controller: Once you feel comfortable managing 1 Ingress Controller, before you start looking into other alternatives I highly recommend you figure out how to manage multiple deployments of the same Ingress Controller within a Kubernetes Cluster. I hinted that this was possible in an earlier diagram and now I’ll take some time to really elaborate on that diagram and why it’s so critical to figure out how to manage multiple instances of Ingress Controllers:  Let’s start with what’s going on here: Let’s say that we have 3 Nginx Ingress Controllers running in our Cluster all running version 0.21.0 configured exactly the same way, the main difference between them is that:
- The Private Ingress Controller provisions a Load Balancer with a Private IP that’s only reachable over the LAN and doesn’t specify an Ingress Class. (It implicitly defaults to “nginx”)
- The Public Ingress Controller provisions a Load Balancer with a Public IP that’s reachable over the Internet and it specifies an Ingress Class called “public”.
- The Staging Ingress Controller provisions a Load Balancer with a Public IP and a Network Access Control List that only allows traffic coming from the Public IP of an office where Internal Employees like Devs, Testers, QAs, and Internal Stakeholders are. It also specifies an Ingress Class called “staging”.
The Public and Staging Website’s Ingress objects have annotations that specifically reference their respective Ingress Controllers:
metadata.annotations.kubernetes.io/ingress.class: “public”
metadata.annotations.kubernetes.io/ingress.class: “staging”
The result is that the public site is only accessible over the Public LB, the staging site is only accessible over the Staging LB, and all other sites hosted on the cluster like Grafana are only accessible over the Private LB. So why bother with multiple ingress controllers with multiple classes? What benefits do we get?
- Making it so that by default if someone forgets to explicitly specify a desired ingress class the site will only be exposed to the ops team creates a secure default so a small mistake would be a non-event. (A form of defense in depth.)
- You can expose a preview of your future site that’s only accessible by internal employees. (The Staging Ingress Controller’s LB could have Network ACL rules that only allow it to be accessible from computers on the company’s network.)
- You can create multiple paths to your main site, which allows you to safely test infrastructure, platform, and architectural changes:
-
-
- You can’t reuse ingress classes without causing instability, but you can create a new Ingress object that references the staging ingress controller, but points to your main website, then upgrade the Ingress Controller. (This would allow you to safely discover that a backward-incompatible breaking change was introduced in version 0.22.0)
- You can safely test adding a WAF or other security mechanism in the path of your site, on a 2nd path to your site.
- If you thought your WAF/upgraded ingress controller change was safe but it turned out not to be, switching back is as simple as changing DNS, and if that’s not fast enough for you, you could put a few manually managed HA Cloud Load Balancers in the path or expose services of type ExternalName instead of Ingress Controllers to offer instant cutovers of blue green paths.
- Now in addition to testing upgrades, you can test completely new ingress controllers.
-
When does it make sense to look into other Ingress Controllers: (At first, this will seem like an unrelated aside but bear with me, it’ll tie into Ingress Controllers) Kubernetes has tooling applications that you can install in your cluster, that shift the level of effort and complexity required to implement advanced concepts from insane to still really hard: The advanced topics I’m referring to are things like:
- Automatic HTTPS Certificate Provisioning:
- Service Meshes: A summarized definition of a service mesh is that before service mesh, you might have a distributed application of 20 pods talking to each other over clear text L7 HTTP REST API. You then add a HTTPS L7 proxy as a sidecar container to every pod and force all pod to pod communication to go through the sidecar container proxies. The 3 main benefits Service Meshes offer are:
-
- mTLS: Pods mutually authenticate each other using x509 certs before sending traffic, and all inner cluster traffic occurs over HTTPS encryption, which increases security in multi-tenancy cluster scenarios. (The complexity to benefit tradeoff usually isn’t worth it for this perk, the 2nd perk is the best benefit.)
- Deep Networking Observability: Service Meshes often integrate with Application Performance Monitoring/Distributed Tracing solutions like Jaeger (imagine it as an opensource version of New Relic.) Also when you have a complex distributed application where your frontend talks to an API Gateway, which then talks to N auto-scaling instances of distributed app component 1, which then talks to M auto-scaling instances of distributed application component 2, and so on. Service Meshes give you observability, automated alerting, and queryability into HTTP error codes and latency of pod to pod communication.
- Improved Network Resiliency: It’s important to remember that multiple replicas with 100% infrastructure uptime doesn’t mean 100% error-free fault-tolerance. Readiness probes and static wait times before adding replicas to Kubernetes Cluster IP Services (Inner Cluster LBs) do a pretty good job of being error-free when new replicas spin up. It’s not always the case that a replica scaling down will gracefully remove itself from the pool of backend pods associated with the service without causing a 1-second blip that causes 1 in 1000 transactions to fail. Service meshes can add things like circuit breakers and automatic retries to Layer 7 calls, which can help eliminate errors due to temporary blips/glitches and improve apps that don’t natively support these features.
- Low-Risk Testing of Changes in Production using Live Production Traffic: The most accurate way to test features is with live production traffic. It used to be the case that you’d avoid testing in production at all costs; however, with the right strategies, techniques, architectures, and application design. It’s possible to safely test changes in production:
- Traffic Shadowing/Mirroring: Send all incoming traffic to production + mirror the traffic to a disposable copy of production.
- Need the ability to make and manage clones of stateless components: (Kubernetes makes this part easy.)
- Need the ability to make and manage clones of stateful backend databases: You need to be able to quickly make and maintain 100% up to date copies of all stateful production data, rock-solid quick backup and restores, and the ability to log transactions, so they can be replayed in the event of a rollback and audited for accuracy.
- Authentication Proxies: Kibana (logs), Grafana (metrics), Kubernetes Build-In Dashboard, Kube Web View, and RabbitMQ Management are examples of GUIs that are useful to monitor production, they sometimes have the ability to see sensitive data or make changes. So it’s important to limit access to them. An Ingress Controller attached to a Private IP Address Internal LB is a good start as the web pages will only be accessible by employees with access to your Private Network. However, it’s important to further limit access to only members of the Operation’s Team and not just anyone on the network who knows the default password and do so in a consistent, easily automated, manageable way that’s tied into a centrally managed IAM Database using MFA and SSO. This is the problem that Authentication Proxies solve.
- API Gateways: API Gateways offer several benefits, but one of the most important benefits they offer is a solution equivalent to Authentication Proxies but for app to app communications. Example: You might have a HTTP REST API that can read from, write to, and delete entries in a production database. Then instead of installing a SQL client on distributed application components, a mobile app, or a Webpage your app interfaces with the database using REST API. Well, an API Gateway can allow you to bolt on machine to machine authentication and encryption when talking to the API.
In my opinion, it seems that other Ingress Controllers exist because they make these advanced concepts possible or integrate well with them. Traefik Ingress Controller for example: has built-in support for Traffic Mirroring, automatic HTTPS certificate provisioning, and authentication proxies. An Nginx Ingress Controller could do the same, but not using built-in support, it’d have to delegate to additional Kubernetes Applications like Jet Stack’s Cert Manager, KeyCloak (OIDC provider), and KeyCloak Gatekeeper (OIDC Auth Proxy). Ambassador can do Traffic Mirroring, act as an API Gateway, and integrates well with Istio Service Mesh. Let’s circle back to “When does it make sense to look into other Ingress Controllers?” Only when you have a hard requirement that the Nginx Ingress Controller can’t solve. Example: Having an API Gateway might be a minimum requirement for production go-live, if that’s the case then an Ingress Controller like Kong or Ambassador is worth looking into. Whenever I’m on a project involving Kubernetes, there’s always an overabundance of work to do, and it’s always worth separating must-have for production go-live, vs looks cool and helps enable nice to have features.
Conclusion
Oteemo thanks you for reading this post, if you want to find out more as to DoD Iron Bank services, DevSecOps adoption or Cloud Native Enablement, contact us by submitting our form via our website.
We will be happy to answer all your questions, especially the hard ones!


0 Comments