
Kubernetes Security can not be ignored. In fact, most folks already know and agree on the benefits of leveraging cloud, containers, and container platforms such as Kubernetes. Cloud Native platforms and solutions enable businesses by reducing the time to market and lowering cost of operations through portable, scalable, and resilient workloads. In these initiatives, the elephant in the room, the pending storm cloud from afar — is Security. We work with enterprises in different stages of Kubernetes adoption. Some are investigating possibilities while others have moved production workloads to Kubernetes clusters in the cloud. For this article, let’s assume that a PoC has been done, and running production workloads is being actively considered. There are different installers, distributions, and various managed cloud services to consider. They all have different configurable options with various levels of customization. To gain clarity in this fog, we can identify Kubernetes security aspects across all permutations to consider. In this Kubernetes security 101 article we’ll look into network policies, role-based access control (RBAC), and pod security policies to better manage Kubernetes security or security of any OpenShift cluster.
What to Know About Kubernetes
What is Kubernetes? (The Cliff Notes Version)
Kubernetes is an open-source platform for managing container workloads at scale. It is a resilient, versatile, and self-aware system that can be deployed in almost any environment, such as on-prem or in the cloud. Multiple components within Kubernetes run on continuous loops, observing current status and making necessary adjustments to maintain desired state for a healthy cluster.
A pod is the smallest unit of deployment. It contains one or many containers with mounts for storage, configuration, and secrets. A pod belongs to a Kubernetes namespace. A namespace is a logical boundary within the Kubernetes cluster that can allow for limiting the visibility of what it’s pods can see, the resources they can utilize, and the operations that can be performed in that confined work area. Permissions can apply to the container, pod, namespace, or cluster level.
Labels are a key-value pair on resources such as pods, namespaces, etc. They are the glue for the mechanisms that route traffic, as well as glue for the processes that reconcile the desired current state to ensure the cluster is always at a healthy state.
Any interaction with the cluster is forwarded to the API Server. The API Server is a RESTful frontend to etcd, the brain of the system. In addition to fronting etcd, the API Server is responsible for authenticating and authorizing requests to Kubernetes. The permissions to the API Server leverage specific HTTP verbs in order to view, create, or update resources within the Kubernetes cluster.
Kubernetes Network Policy
By default in Kubernetes, all pods can talk to each other in all namespaces. This is different from OpenShift, where its flavor of namespaces —a project —prevents cross project communication by default. To better manage network traffic, we can leverage network policies, a Kubernetes object that uses labels to control the flow of traffic inside-of and across namespaces.
In most provisioners, you’ll need to choose your own network overlay, which will allow each pod to have their own ip across many machines. A non-exhaustive list of overlay networks include weave, flannel, calico and romana. When selecting the overlay, be sure it enforces network policies, including both ingress and egress rules! If the overlay of choice doesn’t support network policies, or all the features within a network policy, one can naively believe that since a network policy object merely exists within the cluster, it will be enforced.
Here’s an example that drills into the specifications of a network policy:
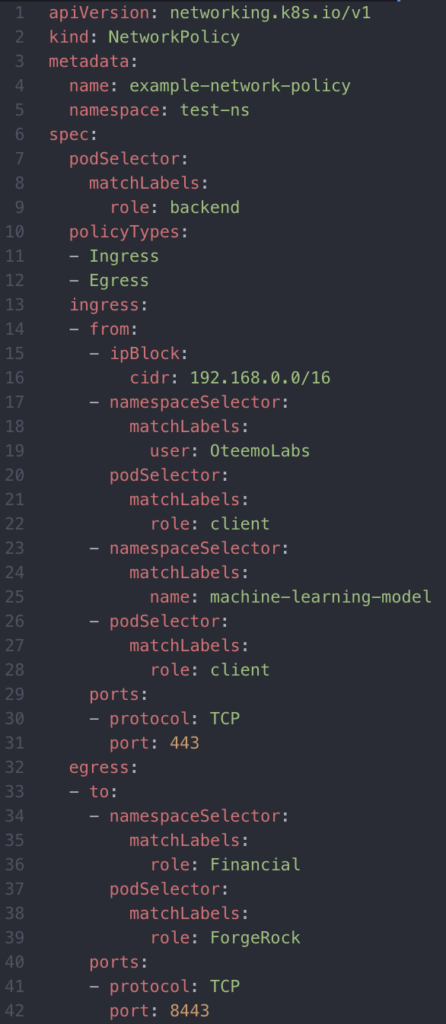
The podSelector is required. Via labels, the podSelector distinguishes the pod(s) the network policy applies to. The PolicyType isn’t required but highly recommended to explicitly declare whether it’s for egress, ingress, or both. If not specified, the policyType(s) are implied by the rules defined. Again, by default in K8s, no traffic is blocked, and all pods can talk to each other, even across namespaces. Once a pod matches a podSelector, all connections will be rejected except for what is whitelisted. A special thing to note is that network policies, in general, do not impact existing connections, only newly created ones.
Both egress and ingress are arrays of rules where traffic is whitelisted. It may be obvious by the naming, but egress rules whitelist outbound traffic while ingress rules whitelist inbound traffic. A rule consists of sources and ports. There are four types of sources:
- An ipBlock: specified ip range. This should be for external traffic only as internal ips to the cluster are transient.
- NamespaceSelector: selects all pods in the namespaces that match the labels.
- PodSelector: selects pods with matching labels in the same namespace.
- The combination of both namespaceSelector and podSelector: does an AND operation for matching labels of pods and namespaces.
The example-network-policy above allows ingress tcp traffic on port 443 from all the following: from the ip range cidr range of 192.168.0.0/16, pods with the label role=client in the namespaces with label user=OteemoLabs, all pods in the namespaces with label name=machine-learning-model, and all pods with label role=client in the local namespace of test-ns. In addition, the example-network-policy above allows egress tcp traffic on port 8443 to all pods with label role=ForgeRock in namespaces with label role=Financial.
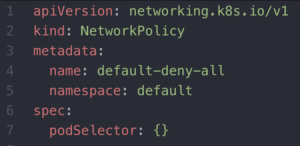
The next example will demonstrate a network policy that is a default deny all traffic in a namespace by simply matching all pods. If there’s any uncertainty, we can always perform a description on a network policy for a description of allowed or isolated connectivity.
In short, with network policies we can better manage inbound and outbound traffic with other pods in our cluster as well as with external entities.
RBAC
*GAME OF THRONES SPOILER ALERT*
Before we get to the entree, we first must savor the appetizer. Think of each kingdom in the Game of Thrones as a namespace. Every kingdom [namespace] has a King or Queen and a Hand. The Hand has a certain number of responsibilities [permissions in a role]. Let’s consider Tyrion Lannister as Hand of the Queen, Daenerys Targaryen: he was responsible for administering meetings, keeping the wine glasses full, and comedic relief as the official joke teller. In Kubernetes speak, we would say that a roleBinding would grant Tyrion [an Actor], a set of permissions declared in a role within his namespace. Now fast forward for when Tyrion is the Hand of the six kingdoms. At this point we would need a set of permissions defined on a global scale, hence a ClusterRole and ClusterRoleBinding.
For kicks and giggles, let’s draft up what this would look like in Kubernetes.
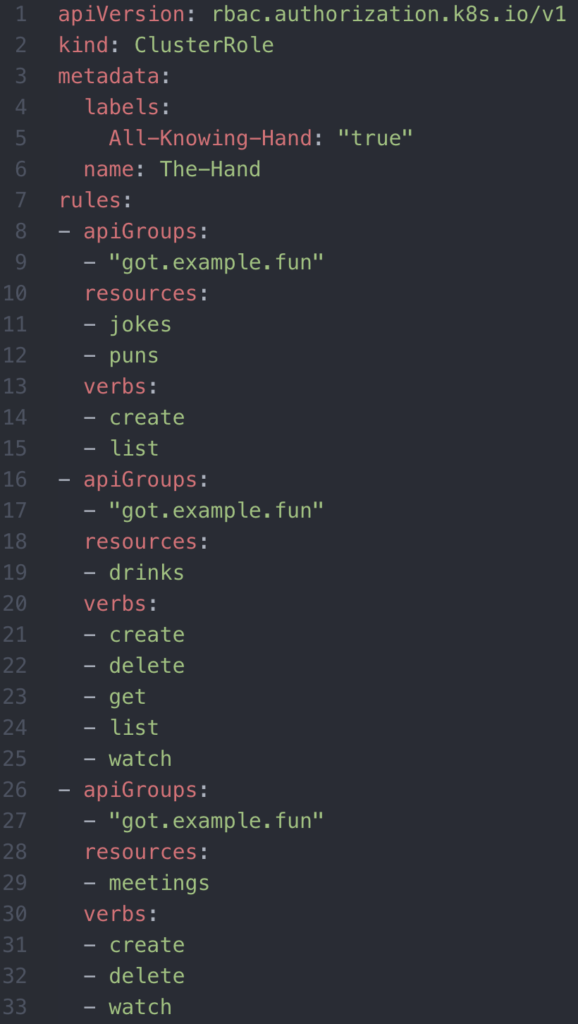
The ClusterRole, of The Hand, entails the series of permissions such as creating meetings, jokes, and drinks.
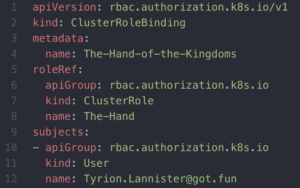
The ClusterRoleBinding grants Tyrion Lannister the permissions of The Hand.
In summary, a roleBinding will apply a role containing a set of permissions to an Actor in a given namespace. A ClusterRoleBinding will apply a ClusterRole containing a set of permissions to an Actor across the cluster. A roleBinding needs a namespace, a clusterRoleBinding does not. (Side note: in the scenario we want to leverage a set of permissions defined at a clusterRole to an Actor in a namespace without repeating ourselves, we can do so, by binding the clusterRole to the actor with a roleBinding and namespace).
Up until this point we’ve assumed an Actor to be a person or User interacting with the system. The entry point to viewing or updating cluster state is the API Server. In the case that a pod needs to create, read, or modify other objects in the cluster, a pod would need what is known as a service account. A service account represents the identify of the pod, when communicating with the API Server. A pod’s service account would be bound to a Role or ClusterRole via a RoleBinding or ClusterRoleBinding, in order to have the proper permissions to interact with the API Server (to manage or view resources). To drive this home, let’s suppose we have a Jenkins Master in our cluster and would like to dynamically spin-up and spin-down pods for our CI/CD pipelines. Our Jenkins Master would then need special permissions to properly manage Kubernetes resources.
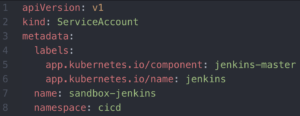
The Jenkins Master would need a service account, like the one above. Notice this in the cicd namespace. Since we want Jenkins Master in the cicd namespace to do admin-like operations in all other namespaces, let’s grant it a cluster-wide admin permissions. Coincidentally, there is already a default admin-level clusterRole (for both K8s and OpenShift), named cluster-admin. The next illustration will show a declarative definition of Jenkins Master service account being granted cluster wide permissions using a ClusterRoleBinding to grant the service account cluster-admin ClusterRole.
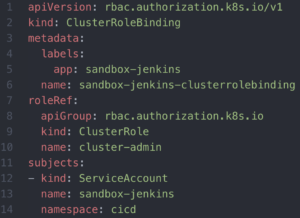
Our Jenkins Master cluster role binding. Note that it uses the default cluster-admin clusterRole
In short, by leveraging RBAC, we can ensure the folks within our company as well as pods within the cluster are only given the privileges they need.
Kubernetes Security Pod Security Policy
To ensure that a pod (and its containers) abides by a set of security rules, one can leverage the Kubernetes security Pod Security Policy (PSP). The rules defined in the Pod Security Policy are enforced by an admission controller, meaning that once the request to the API Server has been authenticated and authorized, before any change is made, it must meet the guidelines defined in the PSP. Not all distributions will support pod security policies by default. Ensure the proper config is set or find a different distribution that allows pod security policies.
Let’s create a default restricted PSP:
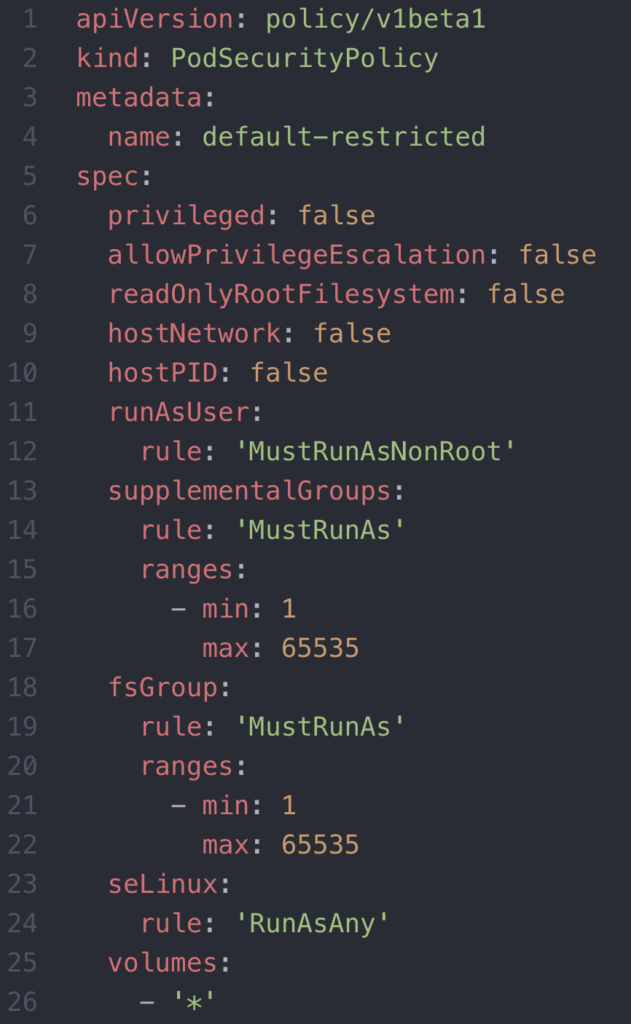
This PSP does a number of things: (a) prevents pods/containers from having access to devices on the host (b) prevents privilege escalation (ensures no child process can supersede the privilege of the parent process) (c) prevents containers from running as root (d) prevents group id of containers and groups applied to volumes from being root (e) allows any seLinux options to be specified (f) allows all types of volumes: e.g. config map, secret, etc. Capabilities not leveraged in this particular example, but still of use would be allowingHostPaths (specifies which directory a pod/container can use from the host in addition to the permissions the pod/container has with the directory), usage of apparmor and seccomp profiles to restrict system calls and processes, as well as sysctls to read or manipulate attributes of the kernel of the underlying node(s).
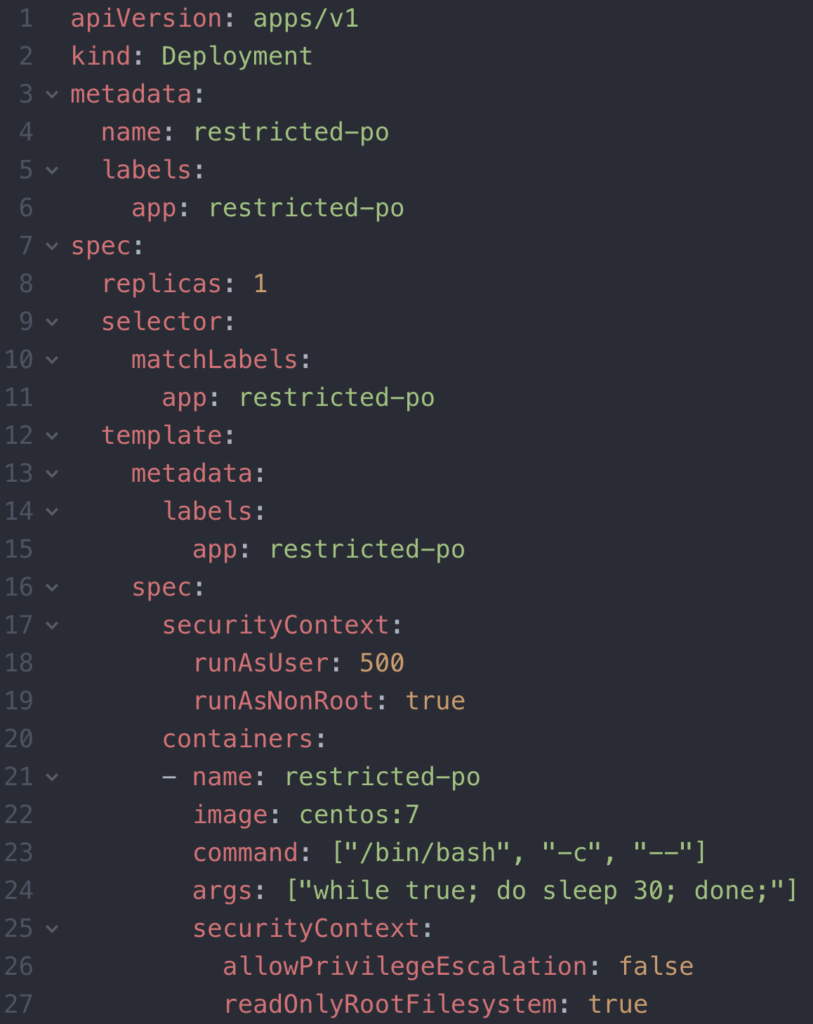
Next, let’s deploy a pod that abides by the Kubernetes security PSP. You may notice that in the deployment definition, there is a securityContext at the pod and container level. To ensure the PSP guidelines are met, the admission controller looks at the Security Context on a pod, and if overridden at the container level, it will look at the Security Context at the container level also.
The pod will never be deployed if the SecurityContexts don’t meet the guidelines for the PSP.
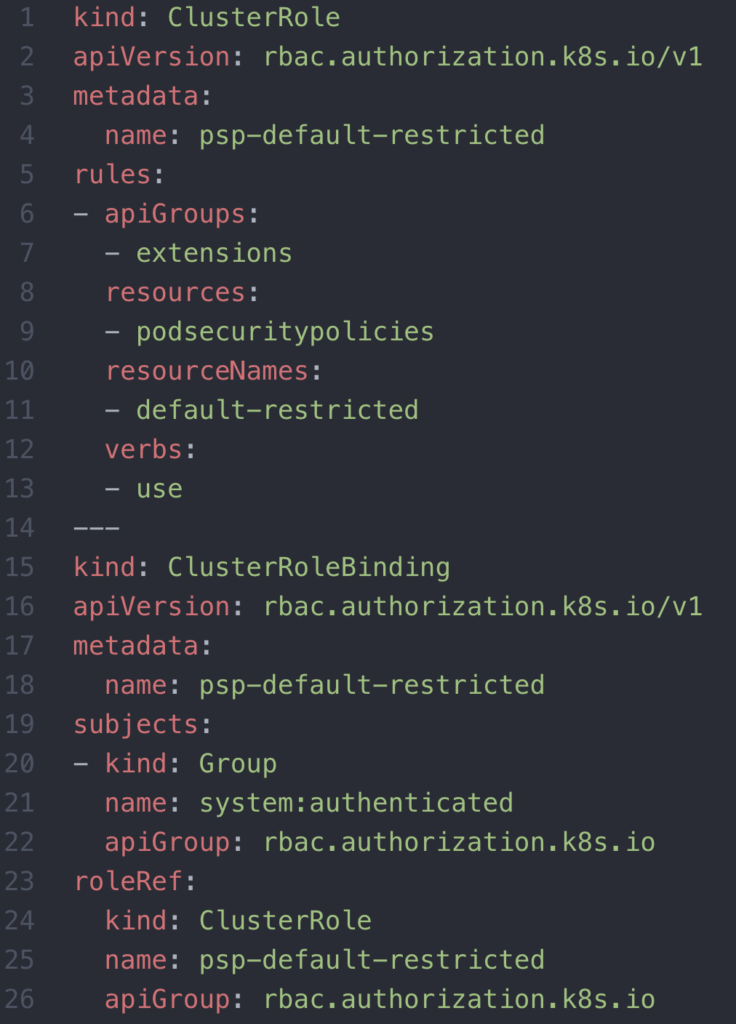
Notice how the pod isn’t coming up, although it abides by the PSP. An important concept is that simply having the PSP defined isn’t enough. The role or clusterRole bound to the service account of the pod must declare that it uses the PSP(s). Below is a clusterRoleBinding that allows the PSP to be enforced by any resource deployed by any authenticated entity.
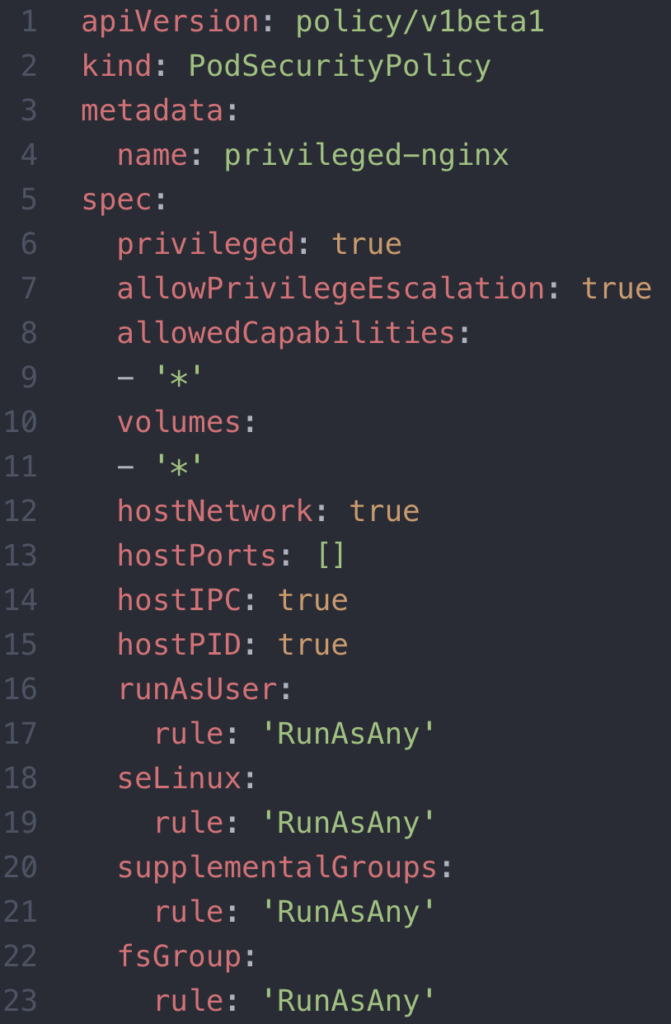
Next, let’s deploy a pod that uses a root user. Since our default restricted PSP doesn’t allow this, we’ll need to set up the proper PSP, service account, role, and roleBinding before we launch the privileged pod. Here’s a PSP, privileged-nginx, that allows the resources to run as root and is quite permissive in general.
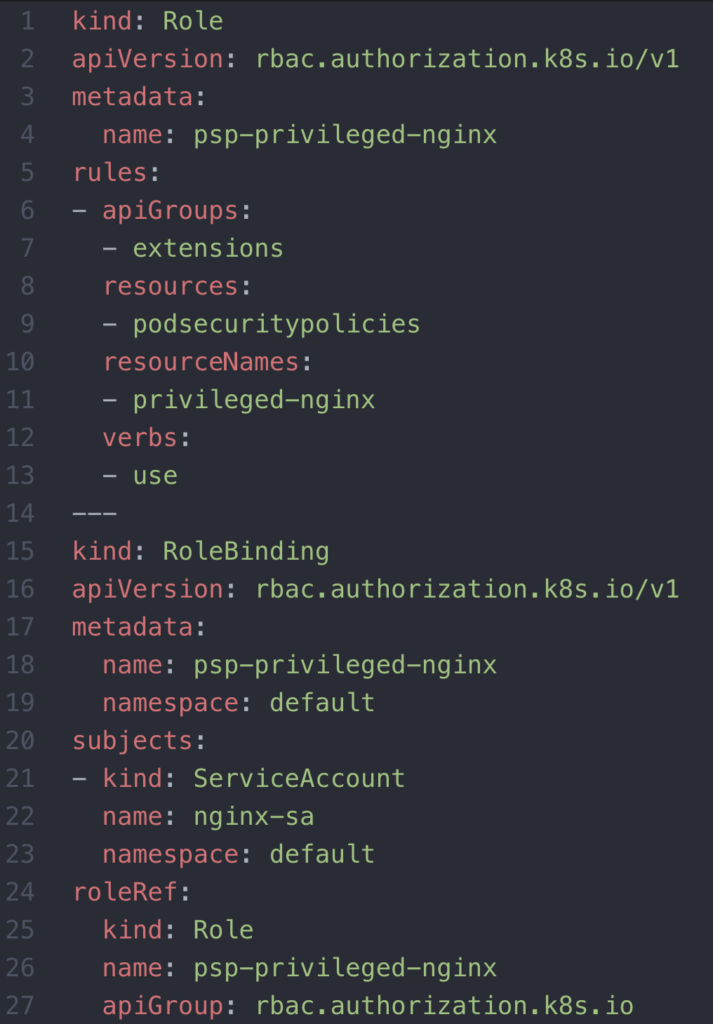
We’ll need to create a service account with the command: `kubectl create sa nginx-sa`. Next, we’ll enable the service account to use the PSP:
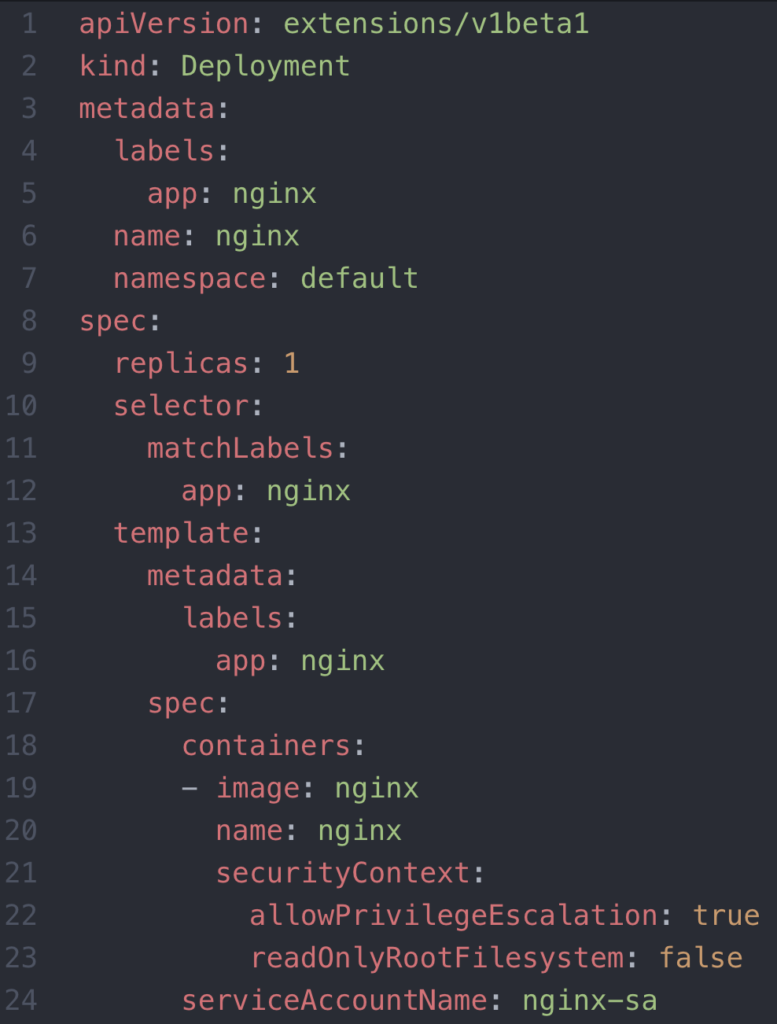
Now, we can deploy our nginx container that runs as root. A container with no Security Context or no specification in the image (definition of the container) of which user it should run as, will, by default run as root.
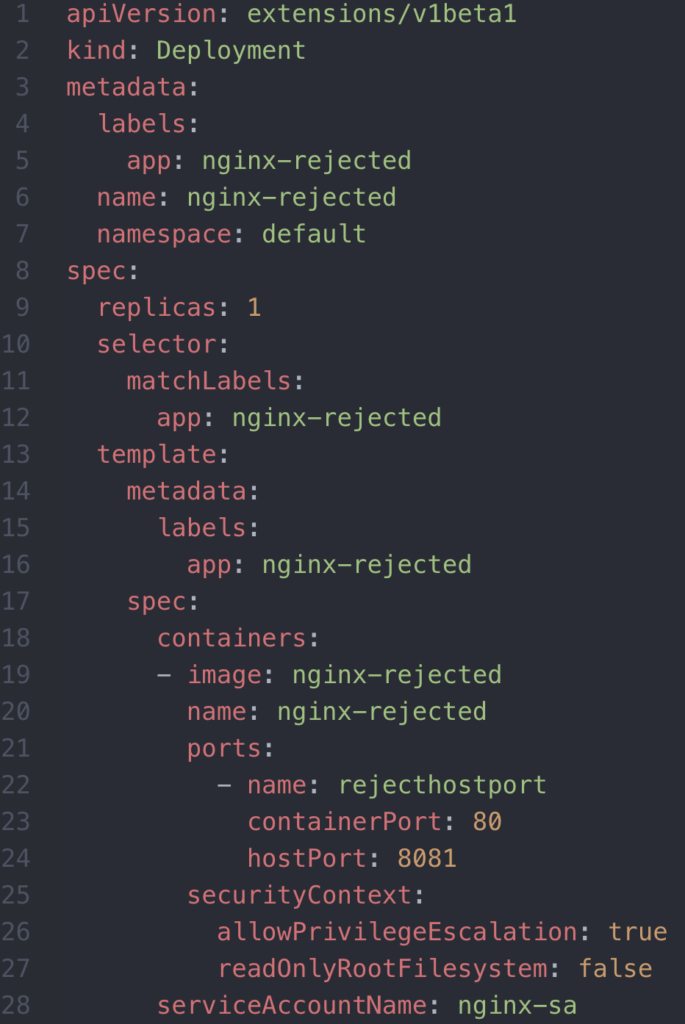
The privileged-nginx PSP was permissive, with one subtlety. It rejects hostPorts. Opening a hostPort on a container can make it easier for a developer to test their application, but can expose an endpoint without TLS, a vulnerability we can easily avoid with PSPs and Security Contexts. The next example demonstrates deploying a rejected pod from starting due to an unwanted hostPort.
This tells us the importance of separation of concerns. The developer of an application shouldn’t necessarily be the person responsible for defining the service account that their app leverages (this goes back to our discussion on RBAC).
At this point, we understand that the PSP is a set of guidelines a pod’s service account must use to ensure the PSP guidelines are enforced. With PSPs, we have a contract for how a pod can leverage k8s and host-level resources.
Kubernetes Security Summary
In short, we’ve touched on the basics around security from a workload, cluster, and people perspective that applies to both Kubernetes security and OpenShift security. With Network Policies, we can restrict what a pod can communicate with; via RBAC, we have better controls on what people and pods have privileges to perform when viewing or modifying cluster state; lastly, with Pod Security Policies we can enforce granular yet crucial permissions on apps developers deploy.


0 Comments
Trackbacks/Pingbacks